Encrypted debian install @ovh
I recently had to install a debian encrypted host on a scaleway server. I remember reading about unattended installs using qemu-kvm, but none did fit my setup. Based on this amazing article from Quentin JOLY, I found a suitable and quite elegant way to do things.
This setup was tested on a scaleway store-4-M and an OVH VPS-2. As this only requires some space and a qemu capable rescue mode, it should work with most bare metal cloud providers.
Environment#
Cloud provider such as ovh, scaleway or hetzner provide a rescue mode. This mode boots live system with our drives attached.
The idea is basically to run a Debian install using qemu with our host disk as if it was a virtual machine.
To put my VPS in rescue mode, I had to follow :
- Bare Metal Cloud => Virtual private servers => Chose the VPS you want to reinstall
- Your VPS => Boot => Reboot in rescue mode
As some actions can be blindfolded, I recommend opening a kvm to understand what’s going on.
Running the install#
Please notice this will erase all your data
First things first#
BIOS or EFI ?#
I used an OVH vps to write this post. OVH sadly doesn’t support EFI boot for those hosts.
You may use this command to know if you rescue booted as UEFI or Legacy:
[ -d /sys/firmware/efi ] && echo "UEFI" || echo "BIOS/Legacy"
If your provider supports it; you can enable it by providing 2 extra lines to your qemu commands:
-drive if=pflash,format=raw,readonly=on,file=/usr/share/OVMF/OVMF_CODE_4M.fd \: enables uefi-drive if=pflash,format=raw,file=./OVMF_VARS_4M.fd: Use a local uefi file to write boot instructions in (better for post install).
Do not forget to copy run cp /usr/share/OVMF/OVMF_VARS_4M.fd ./ to get a local RW uefi file.
Network setup#
As we are going to run some manual install, we should keep track of our ip/gateway, this will be usefull later.
Run ip -br address and ip route on your host, keep them in a scratchpad.
We now can start the actual install setup.
Setup#
We need to download our toolkit: qemu utils and an installer.
The qemu part is as easy as:
# on OVH, the rescue is a debian 12
apt update && apt install -y --no-install-recommends qemu-system-x86 ovmf wget
# on Scaleway, the rescue is an ubuntu
apt update && apt install -y --no-install-recommends qemu qemu-system-x86 ovmf wget
The tricky part is that a debian netinst iso is about ~780Mo, my ovh rescue has only 193Mo after installing qemu… So what ?
Reading the debian installer wiki; we get that we have two options:
- Using mini.iso
- Using a good old kernel+initrd boot
TIP: the dowloaded files can be found in the corresponding debian-installer-${version}-netboot-${arch}
mini.iso#
You can download the miniso from the debian mirror:
DEBIAN_RELEASE=trixie
wget https://deb.debian.org/debian/dists/${DEBIAN_RELEASE}/main/installer-amd64/current/images/netboot/mini.iso
I am going to run the install on /dev/sdb but you could give the installer as many drives as required for your setup.
DRIVE=/dev/sdb
qemu-system-x86_64 -m 2G -cpu max -enable-kvm \
    -device virtio-net-pci,netdev=net0 -netdev user,id=net0 \
    -drive if=virtio,cache=unsafe,format=raw,file="${DRIVE}" \
    -cdrom mini.iso \
    -boot cd \
    -vga qxl \
    -spice port=5900,addr=127.0.0.1,disable-ticketing=on
Parameters:
-m 2G -cpu max -enable-kvm: grant to the vm 2G of ram, max cpu and kvm capabilities-device virtio-net-pci,netdev=net0 -netdev user,id=net0: network interface required as we run a network install-drive if=virtio,cache=unsafe,format=raw,file="${DRIVE}": attach the desired drive => can be done multiple times-cdrom mini.iso: iso to boot from-boot cd: boot from first drive or cd-vga qxl: add virtual display-spice port=5900,addr=127.0.0.1,disable-ticketing=on: attach spice to virtual display
This will run the qemu vm without printing anything to the terminal. To connect to the display, one should make a local ssh port forwarding such as ssh -p22 -L 5900:localhost:5900 root@${HOST} with the host as your rescue server.
Connecting to the display through the ssh port forward, we see the graphical installer as would be in libvirt.
remote-viewer spice://127.0.0.1:5900
Run the install as you wish, then get to the post install section.
kernel+initrd install#
This is my favorite way to run the install for the following reasons:
- It doesn’t require ssh forwarding
- We can use a preseed to automate the install
We first need to download the required files: kernel+initrd.
Getting initrd from debian installer grants us a minimal installer as mini.iso does.
DEBIAN_RELEASE=trixie
wget https://deb.debian.org/debian/dists/${DEBIAN_RELEASE}/main/installer-amd64/current/images/netboot/debian-installer/amd64/linux
wget https://deb.debian.org/debian/dists/${DEBIAN_RELEASE}/main/installer-amd64/current/images/netboot/debian-installer/amd64/initrd.gz
The install could run using the following command:
DRIVE=/dev/sdb
qemu-system-x86_64 -m 2G -cpu max -enable-kvm \
    -device virtio-net-pci,netdev=net0 -netdev user,id=net0 \
    -drive if=virtio,cache=unsafe,format=raw,file="${DRIVE}" \
    -no-reboot \
    -nographic -serial mon:stdio -echr 8 \
    -kernel linux -initrd initrd.gz \
    -append "console=ttyS0,115200n8"
Some changes are done compared to mini.iso install:
-no-reboot: Disable auto reboot after install => required not to loop in the installer.-nographic -serial mon:stdio -echr 8: Disable graphical driver and setup a serial console instead.-kernel linux -initrd initrd.gz: Kernel and initrd used (must be in the current directory).-append "console=ttyS0,115200n8": Add an argument to the boot command line to start the console.
Preseeding#
In my opinion; the real power of the initrd+kernel setup is the ease to us preseeds.
To do so, the debian wiki grants us a nice oneliner:
{ cat initrd.gz; echo preseed.cfg | cpio --format=newc --create | gzip -c; } > initrd-custom.gz
This command will inject preseed.cfg from the local directory directly to the initrd image; making
us to automate the installation.
I use this preseed file for vps/vms, you could use this preseed for physical hosts. The main difference between thoses is the use of cloud kernel which gets rid of hardware driver stuff.
Those are built using debian’s example preseed.
Basically those preseed answers those questions:
- Set localization configs (keyboard layout, timezon etc, mirror etc…)
- Disable root password (use sudo as nonroot)
- Encrypted LVM for filesystem with server partitioning
- Disable install recommends an non essentials tools
- Install SSH
- Enable serial console post install
- Force reboot
Using those preseed, one would be prompted for user/password, disk to install on and luks password.
The final install setup should look like this:
DRIVE=/dev/sdb
{ cat initrd.gz; echo preseed.cfg | cpio --format=newc --create | gzip -c; } > initrd-custom.gz
qemu-system-x86_64 -m 2G -cpu max -enable-kvm \
    -device virtio-net-pci,netdev=net0 -netdev user,id=net0 \
    -drive if=virtio,cache=unsafe,format=raw,file="${DRIVE}" \
    -no-reboot \
    -nographic -serial mon:stdio -echr 8 \
    -kernel linux -initrd initrd-custom.gz \
    -append "console=ttyS0,115200n8 auto"
When getting back a terminal we have to run a few steps out of the installer; first we have to restart the vm without the initrd parameters:
qemu-system-x86_64 -m 2G -cpu max -enable-kvm \
    -device virtio-net-pci,netdev=net0 -netdev user,id=net0 \
    -drive if=virtio,cache=unsafe,format=raw,file="${DRIVE}" \
    -nographic -serial mon:stdio -echr 8
Post Install#
Depending on the way you chose to run your install; you should now be in a console logged in as root.
We will install dropbear-initramfs, this will allow us to unlock the luks volumes from the network.
apt install dropbear-initramfs
We first edit /etc/dropbear/initramfs/dropbear.conf:
DROPBEAR_OPTIONS="-I 30 -j -k -p 2222 -s"
-I 120: Disconnect the session if nothing is received within 30 seconds.-j: Disable local port forwarding-k: Disable remote port forwarding-p 2222: Listen port, usefull not to have warning of ssh key changes on unlock.-s: Key authentication only
Then create /etc/dropbear/initramfs/authorized_keys file to be able to connect. Put your plubic ssh key in it.
Last but not least, we have to set an IP address to our initrd. Dropbear defaults to dhcp, but OVH affects /32 IPs which is not supported by initramfs. As a workaround, we will grant initramfs a static ip by creating /etc/initramfs-tools/conf.d/ip:
IP=192.168.24.37::192.168.16.1:255.255.0.0::
This variable is an example, keep carefully the columns as they are required to match other kinds of setup (network boot). The ips used here are examples, use our own not to run into… Troubles…
192.168.24.37: Our vps IP we put in scratchpad earlier.192.168.16.1: Our vps default gateway (from the scratchpad too).255.255.0.0: subnet mask, even on public web we have a gateway, but they to not have to be in our/24, thus we apply a/16.
We did all we needed, now we can rebuild our initramfs images (probably only one at the moment):
update-initramfs -k all -u
Time for the big leap#
Our host is ready, we thus can shut down our vm and exit the rescue host.
Then head to your cloud provider console. In OVH, I just hit Reboot my VPS.
Opening the kvm, we see our vps applied its ip address and waits for input.
We then can unlock it via ssh, I usualy set a custom ssh_config entry to easily get back in:
Host unlock-myvps
  Hostname my.vps.ip.address
  Port 2222
  User root
Please notice you have to login as root. Running ssh unlock-myvps will display this screen:
ssh unlock-calcium
To unlock root partition, and maybe others like swap, run `cryptroot-unlock`.


BusyBox v1.37.0 (Debian 1:1.37.0-6+b8) built-in shell (ash)
Enter 'help' for a list of built-in commands.
~ #
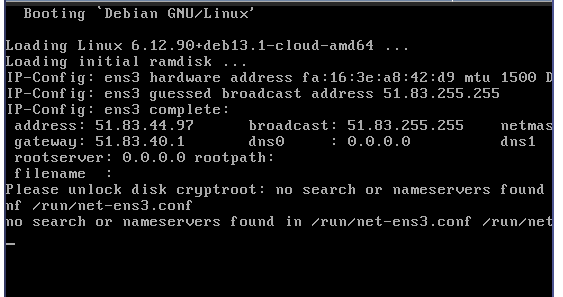
Type cryptroot-unlock, enter the password of your luks host and wait for this message:
~ # cryptroot-unlock
Please unlock disk cryptroot:
cryptsetup: cryptroot set up successfully
~ #
Congratulations, you unlocked your vps, thus you now can SSH into it !

No worries, I got your back ! :D
Recovery from initramfs#
I like me you forgot to add your ssh key; or just broke your setup, you have a way to recover from the initramfs. This avoids us to get back to rescue mode, which is nice for lazy people like me ! :D
In the initramfs shell you can run some operations instead of running cryptroot-unlock. We will unlock our root partition, mount the directories in the right other and chroot in it.
~ # blkid
/dev/sda2: UUID="98f9f641-1077-4137-b1e8-8bc50fbe2513" BLOCK_SIZE="4096" TYPE="ext4" PARTUUID="eb0fd345-0e34-4f46-b59e-71cff1e163f9"
/dev/sda3: UUID="a98a6165-e9e0-4dea-ba25-53b5113f7559" TYPE="crypto_LUKS" PARTUUID="fd1a5db3-dad2-4a17-95d5-e171c57489b4"
/dev/sda1: PARTUUID="7890a729-ffa6-4d02-b2eb-1af4ff02ccf3"
Considering you did a basic setup (or used my preseed), the cryptroot is /dev/sda3. Let’s unlock it !
~ # cryptsetup luksOpen /dev/sda3 cryptroot
Enter passphrase for /dev/sda3:
~ # blkid
/dev/sda2: UUID="98f9f641-1077-4137-b1e8-8bc50fbe2513" BLOCK_SIZE="4096" TYPE="ext4" PARTUUID="eb0fd345-0e34-4f46-b59e-71cff1e163f9"
/dev/sda3: UUID="a98a6165-e9e0-4dea-ba25-53b5113f7559" TYPE="crypto_LUKS" PARTUUID="fd1a5db3-dad2-4a17-95d5-e171c57489b4"
/dev/mapper/myvps--vg-root: UUID="c9b47d31-db49-4aa1-9457-ab9cbee9473e" BLOCK_SIZE="512" TYPE="xfs"
/dev/mapper/myvps--vg-srv: UUID="8c35a3d9-3483-4df0-8116-ea2a11e6de82" BLOCK_SIZE="512" TYPE="xfs"
/dev/mapper/myvps--vg-var: UUID="bf7e0182-c3db-43c2-a4a3-674ef988f207" BLOCK_SIZE="512" TYPE="xfs"
/dev/mapper/cryptroot: UUID="eySYl4-UWKF-KFcX-dWDg-JPGW-nANr-h8oqzI" TYPE="LVM2_member"
/dev/sda1: PARTUUID="7890a729-ffa6-4d02-b2eb-1af4ff02ccf3"
/dev/mapper/myvps--vg-swap_1: UUID="a1d51461-f277-4609-93d3-95738cf560ba" TYPE="swap"
We now can mount the partitions, bare minimum will be /, /var and /boot for boot fixes.
~ # mount -t xfs /dev/mapper/calcium--vg-root /mnt
~ # mount -t xfs /dev/mapper/calcium--vg-var /mnt/var
~ # mount -t ext4 /dev/sda2 /mnt/boot
~ # for d in dev proc sys run; do mount -o bind /$d /mnt/$d; done
~ # mount -t devpts devpts /mnt/dev/pts
You now can chroot /mnt /bin/bash then do some fix such as install openssh-server or add your ssh-key to your user !
After that, simply exit the chroot and run reboot -f to reboot your vps. If your shell freezes during the reboot; just ssh with another one to cryptroot-unlock and appreciate your fixes.
Conclusion#
We now have a quite complete way to install a root encrypted server on common cloud providers. To go further, we could setup tang and clevis to automatically unlock after reboot. Maybe in a future post ?